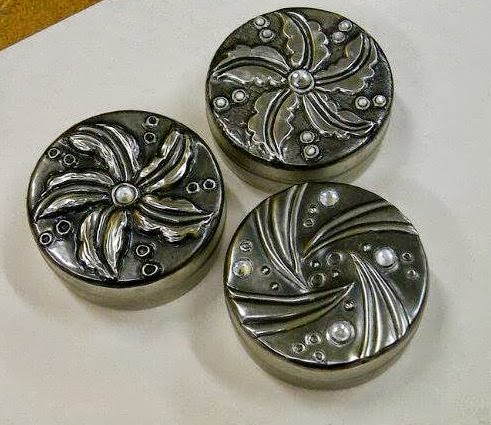
This was a beautiful jewellery box made for my by my friend Sharon. Aside from the fact that she must have taken hours to make the pewter box she did this master piece of art work in the inside. I wish I could show you just how EXQUISITE it really is. She is a fine artist and does the most beautiful artwork so to be given something like this was an absolute delight for me.
Thursday, October 17, 2013
Gift from Sharon Vallance
This was a beautiful jewellery box made for my by my friend Sharon. Aside from the fact that she must have taken hours to make the pewter box she did this master piece of art work in the inside. I wish I could show you just how EXQUISITE it really is. She is a fine artist and does the most beautiful artwork so to be given something like this was an absolute delight for me.
Friday, September 27, 2013
Tuesday, September 24, 2013
Sunday, September 22, 2013
Friday, September 20, 2013
Pewter Tips

This Guest book was spiral bound, so I thought lots of pretty bows would look awesome. It also makes displaying the book ...pretty cool.

When you are working on detail, instead of using your tracing tool to tuck the edges, or your paper stub, try using a No2 Ball it won't cut your pewter and your work will be a lot neater. I am using a paper stub less and less. Only use the paper stub to flatten the background - don't forget try not to leave lines. Also use your finger to flatten the background.. fingers are nice and soft.
Sunday, August 25, 2013
Positive and Negative Space
I wanted to show students in my pewter classes what I mean when I say get rid of all the ski jumps! What are ski jumps, well now that is a one of my own terms to describe what it looks like when the negative space is not flattened properly.
Pewter moves when you work with it so if the background is not kept flat throughout the process one can easily feel that the pewter is controlling you and the pattern might get lost.
This is an example of what NOT to do.
Tip: Don't use too much pressure when tracing the pattern. If you are heavy handed, take a deep breath, relax and go slowly. Before you begin to push out the low or high relief, flatten the background with your finger so that you can see the pattern clearly.
Tuesday, July 23, 2013
Pewter Tools & Materials

1. Patina
2. Meths
3. Stainless steel mug and wax
4. Clear lacquer
5. Polish - Brasso or Never Dull
6. Cloth for polishing
7. Board to work on.
8. Pewter embossing tools
9. Contact glue
10. Cutting mat
11. Rubber gloves
12. Eye droppers for the wax
13. Paper stubs
14. Felt
15 Metal ruler
16 Cotton wool pads - to clean before patina
17. Metal handle embossing tools
18 Batting for patina
19. Lead free Pewter
20. Crystals and beads
Sunday, June 23, 2013
Beginners Class
There will be a beginners class on Saturday the 29th June. Please contact me if you would like to come and join in. carylw3@mweb.co.za
Sunday, June 9, 2013
Pewter Classes
Monday, May 20, 2013
One Day Workshop
The Diary workshop is at the end of June, please send your enquiries to me at carylw3@mweb.co.za so that I can book your space. We will not be making a diary as complicated as this one, it takes far too long as you know, but there will be different patterns to choose from. This class is only for students who have completed the 8wk course.
Thursday, April 25, 2013
Pewter Diaries and Journals

Several years ago I tried a whole lot of samples which ended up on my wall in the kitchen. When looking at patterns try repeating them and doing them in different ways to see how different they look.

Next month is June already, how time flies when we are having fun. If you are interested in making diaries for the New Year, please contact me so that you can book for the class at the end of July, when we start planning and making Christmas gifts. Don't leave things to the last minute. Just think, when you have made all your gifts well in advance.. woo hoo, you can sit back while everyone else is rushing around wondering what to buy.
At the end of each month up until November I will be doing a Christmas Class especially for all the students who completed the 8wk course. I will keep you posted.
Monday, April 15, 2013
Happy Student
I found the course fun to do as well as very
comprehensive in teaching me a multitude of different techniques for working
with pewter. I enjoyed the fact that
Caryl teaches techniques but allows each student to show their individuality in
how they use the techniques they are taught.
I thoroughly enjoyed the course and would definitely recommend it to
anyone interested in learning or improving their skills in pewter work.
-Janet-
Sunday, March 24, 2013
Pewter Case for Glasses or tools to travel.
Don't you just love it when someone else makes something, they make all the mistakes, then you can do it properly!! I wanted to see if I could get this pewter to shape around the corners. OK so here is the wrong way of doing it and how I would do it next time.
1.
Draw around the case with a pencil onto tracing paper.
leave enough around the edge not only to go down the sides but also have about 3 mm more to tuck over inside the box.
2.
Don't glue all of the pewter before you put it onto the case. First glue the design that touches the top of the case and leave the sides for later. Allow this to dry prperly so that it doesn't slip around while you are pushing and pulling.
3.
Be patient, which I am not. My daughter is coming for lunch and I wanted to finish this before she arrives... one and a half hours?... ridiculous !
4.
When you have made sure the top has stuck down nice and firmly, don't cut a 'V' into the corners as I did, rather cut one nik into the corner and then fold one side in and then the other. Glue all the way around the pewter and the case, allow a few minutes to become tacky.. contact glue must be on both sides. When it is dryish... fold one half of the pewter in as you would do when wrapping a present, and then do the other side, folding the corners in neatly like a present, well it is really... a gift for you :o)
5. Now here is the trick, take the back of one of your tools and rub the pewter hard against the case to flatten it completely and squash out any bubbles and neaten off the corners. there will now be that 3mm I was talking about left over. Don't rush it, first let the sides dry properly. Now add glue to that last little bit and tuck it over using the back of one of your tools. Voila Good luck.
Now I am going to write something underneath my pewter and then do this same thing on the underside of mine.
Wednesday, February 20, 2013
Commission for an 80th Birthday
Subscribe to:
Posts (Atom)